
 We have been taking Maisie to the beach almost every weekend since she was old enough to go. She loves it there, rain or shine, hot or cold, it is one of her favorite things to do and she knows when it’s time for another beach day. She can tell by the way we are dressed and how long we sit and drink our coffee, a trip to the beach is on the morning list. Before we got Annie, she would head straight for the basement shower when we got home and patiently wait for all of the sand to be washed away.
To say this shower is rustic, is probably being kind. There is nothing fancy about it and the opening is about 24″ wide. The best way to get her clean was to get in there with her because there is no way to reach her otherwise. The sink is right next to the shower opening so you need to squeeze by the sink to get into the shower. Really, the whole thing needs to be torn out and reworked, but for dog washing purposes and the occasional teenage boy sleepover it served the purpose.
When we brought Annie home I knew that there was no way she would go in there. She didn’t like small spaces or doorways and this was the tiniest space in the house with the most narrow doorways. We had to figure out an alternative because in order to treat and control her itchy skin, she needed twice weekly medicated baths. The tiny shower just would not work!
My best ideas come to me in the middle of the night, and that’s when I found a solution. Shortly after we moved into this house we relocated the laundry machines from the basement to the second floor. Left behind was a huge 48″ cast cement double sink that we were using mainly to wash paint brushes. Talk about wasted space! If we removed the sink, we could build a shower base 20″ off the floor and the drain and water supply lines could stay in the same place. When I said to my husband “I have an idea”, as usual, he was completely willing to put in the work to make my vision come true.
The deep mop sink, which was found on a bargain website, gets filled with soapy water and then we use a submersible pump and hose to lather them up. ( Annie’s foster dad gave us that brilliant idea when he gave her a bath the day we picked her up.) We got tile from the tile discount warehouse nearby and a rolling cart to tuck into the corner that houses my supplies, towels, and the dryer.
Chris built a rolling step with locking casters that stores underneath the ba se. Maisie jumps right up without the step but Annie uses it so that she can easily walk in when it’s bath time. It also works well with the grooming table (Maisie despises the grooming table, Annie stands patiently like it’s no big deal).
I hung pictures of all of our dogs all around the  room but the 3 Princesses each have a place of honor right over the rolling cart. Bailey in the snow, Maisie at the beach and Annie in our backyard.
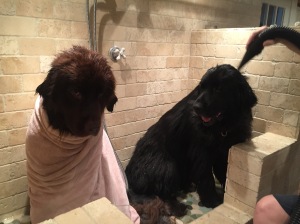 We didn’t intend on bathing them together but one day Maisie decided to jump in with Annie and they both fit so we went with it. We also blow off a lot of the water with the dryer before they get down. It keeps the hair and water contained and then I can move them one at a time to the grooming table if we are doing a full groom. (This doesn’t happen after every bath, only when I’m feeling especially motivated).
Once they are completely dry they get a full brush out and trim.
No more climbing in the shower with the dogs, we can now easily reach them to wash and rinse.
Voila, a fabulous area to wash the dogs and sweet-smelling pooches as the final result!


Love this!
LikeLiked by 1 person
Great job – perfect solution for the pups.
LikeLiked by 1 person
nicer than my bath! it’s so sweet that they go in there together! ❤
LikeLiked by 1 person
I know! One time Annie did not want to get in and Maisie was already washed but she hopped back in and sat next to Annie, so now we just do them together!
LikeLike